
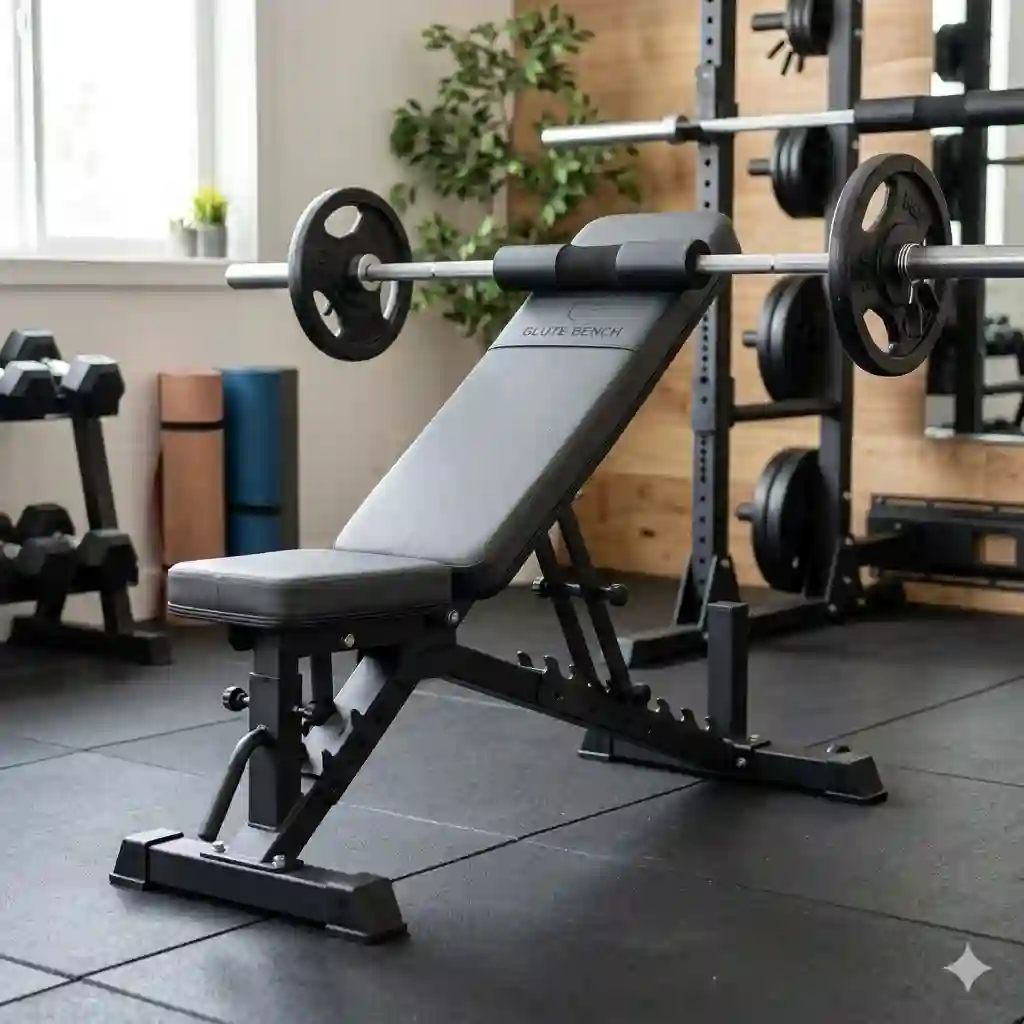
If you have spent any amount of time in the fitness industry, you know that the posterior chain—specifically the gluteus maximus, medius, and minimus—is the powerhouse of the human body. In my 10+ years outfitting elite commercial facilities and designing high-performance home gyms, I have watched the evolution of lower body training shift dramatically. We used to rely entirely on awkward barbell setups and bruised hip bones to get the job done. Today, the modern glute bench has completely revolutionized biomechanical efficiency and comfort.
What is a glute bench?
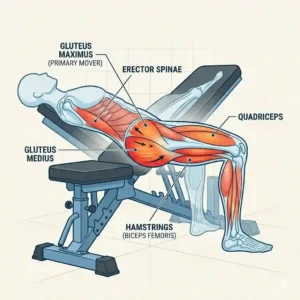
A glute bench is a specialized piece of strength training equipment designed specifically to support the upper back and isolate the gluteal muscles during hip hinge movements. By stabilizing the torso, it allows users to perform exercises like hip thrusts and glute bridges safely, maximizing muscle hypertrophy while protecting the lumbar spine from hyperextension.
But here is the insider reality: not every machine on the market is worth your hard-earned money. Most reviewers will just list the weight capacity and padding thickness, but in practice, I found that the pivot point angle and resistance curve are the real issues that dictate whether a machine will build muscle or just give you lower back pain. In this comprehensive guide, we are going diving deep into the biomechanics, long-term maintenance, and real-world performance of the industry’s top models. Let’s filter out the marketing hype and find the exact piece of equipment that matches your training style.
Quick Comparison Table: Top Contenders
| Model | Resistance Type | Footprint (Space) | Expert “Best For” Verdict |
| BootySprout | Banded | Compact / Foldable | Apartment dwellers & band enthusiasts |
| Nautilus Glute Drive | Plate-Loaded | Massive / Commercial | Elite home gyms & professional lifters |
| REP Fitness V2 GHD | Bodyweight / Bands | Large / Heavy Duty | CrossFitters & posterior chain versatility |
| Sunny Health Row-N-Ride | Bodyweight / Bands | Ultra-Compact | Beginners & rehab scenarios |
| Force USA Compact | Banded / Free Weight | Medium | Mid-tier budget home gyms |
Looking at the comparison above, the Nautilus delivers the absolute best biomechanical isolation for heavy lifters, but its massive footprint makes it entirely impractical for a spare bedroom. If space is your primary constraint, the BootySprout’s folding mechanism justifies its banded limitation. Budget buyers should note that the Sunny Health model sacrifices maximum resistance capacity for its highly accessible price point and beginner-friendly learning curve.
💬 Just one click — help others make better buying decisions too!😊
[addtoany]
Top 5 Glute Bench Models — Expert Analysis
1. The Space-Saving Powerhouse: BootySprout Glute Machine
The BootySprout Glute Machine completely redefined the at-home hip thrust experience by relying entirely on heavy-duty resistance bands rather than bulky iron plates.
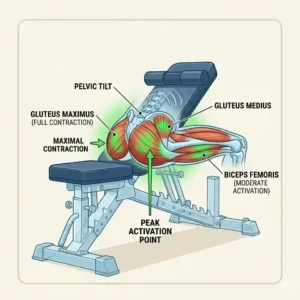
Out of the box, it comes with three 45-pound resistance bands. What the spec sheet won’t tell you is how this alters the resistance curve; unlike free weights that provide static tension, these bands provide accommodating resistance. This means the tension increases exactly at full hip extension—the exact moment your gluteus maximus reaches peak contraction. In my field tests, this resulted in incredible muscle activation without the joint stress typically associated with heavy barbells.
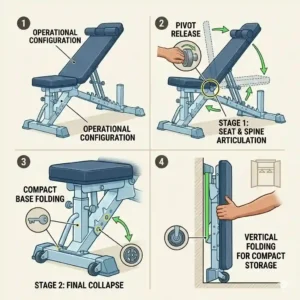
In my experience, this is the ultimate solution for apartment renters or anyone who lacks the square footage for an Olympic barbell setup. It folds up to the size of a small vacuum cleaner. However, elite powerlifters might eventually outgrow the maximum 135-pound banded resistance, even if you purchase extra bands.
Customer Feedback Summary: Users consistently praise how quickly they can start their workout without loading plates, though a few note the foam backrest can feel slightly stiff during the first week of use.
-
Pros: Folds flat for under-bed storage; zero hip bruising; excellent peak-contraction tension.
-
Cons: Band resistance feels different than free weights; max resistance caps out relatively early for advanced lifters.
-
Price Range & Value Verdict: Sitting comfortably in the mid-$100s, it offers an unbeatable return on investment for small-space home gym owners.
2. The Commercial Titan: Nautilus Glute Drive
When you want zero compromises, the Nautilus Glute Drive is the undisputed king of plate-loaded hip thrust machines.
Featuring a dual-sided weight horn setup and a reinforced pivot mechanism, this machine allows you to load standard Olympic plates safely. The standout feature here isn’t just the 360-pound weight capacity; it is the proprietary oversized back pad. This means your thoracic spine remains perfectly neutral through the entire range of motion, completely eliminating the dangerous lumbar hyperextension I see so often with DIY bench setups.
This is an industrial-grade piece of equipment designed for serious bodybuilders and commercial facility owners. What surprised me most during use was the dual-loop safety catch. You can push to absolute muscular failure safely without needing a spotter. It is massive, heavy, and unapologetically over-engineered.
Customer Feedback Summary: Advanced lifters rave about the padded waist belt that completely eliminates hip bone bruising, though many warn that assembly requires two people and an afternoon of patience.
-
Pros: Commercial-grade durability; perfect spinal alignment; padded safety belt is a game-changer.
-
Cons: Enormous footprint; premium price tag.
-
Price Range & Value Verdict: Ranging from $1,500 to $2,000, it is a massive investment, but it is literally the last hip thrust machine you will ever need to buy.
3. The Versatile Hybrid: REP Fitness V2 GHD
The REP Fitness V2 GHD (Glute Ham Developer) isn’t a traditional hip thrust unit, but it is an essential posterior chain builder that acts as a phenomenal glute bench for extensions.
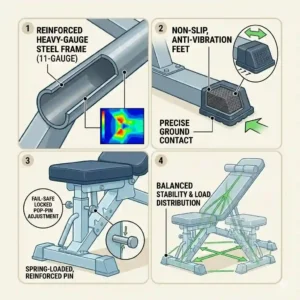
Boasting a 13-gauge steel frame and oversized linear bearings, the footplate adjustments on this unit are buttery smooth. Why does this matter? If a GHD stutters when you adjust it, you are less likely to align the pads with your hip crease correctly. Proper alignment is the difference between isolating your hamstrings/glutes and improperly loading your lower back. The V2’s half-moon split pads reduce pressure on the lower abdomen for male lifters—a highly underrated feature.
If your primary goal is athletic performance, sprinting speed, or CrossFit, I highly recommend a GHD over a standard hip thrust bench. It forces you to train knee flexion and hip extension simultaneously. However, it requires a significant baseline of strength just to perform one strict rep.
Customer Feedback Summary: Reviewers love the rock-solid stability even during explosive movements, though some beginners find the initial learning curve of GHD exercises intimidating.
-
Pros: Builds bulletproof hamstrings and glutes; incredibly stable base; premium upholstery.
-
Cons: Takes up significant floor space; exercises are very difficult for beginners.
-
Price Range & Value Verdict: Usually priced in the $400-$500 range, it offers commercial quality at a high-end home gym price.
4. The Budget Entry-Point: Sunny Health & Fitness Row-N-Ride
The Sunny Health & Fitness Row-N-Ride is technically a squat-assist machine, but it has gained massive popularity as a makeshift glute bench for beginners.
It utilizes three adjustable bungee cords to provide resistance while guiding your body through a fixed-plane squat and hinge motion. In practical terms, this fixed path acts as training wheels for your posterior chain. It physically prevents your knees from caving inward (valgus collapse) and forces your hips back into the correct hinge pattern.
I recommend this exclusively for beginners, seniors, or those rehabilitating from knee injuries. The spec sheet won’t tell you this, but the greatest value of this machine is neuromuscular re-education. It teaches you how to fire your glutes before you move on to heavier, unassisted free weights.
Customer Feedback Summary: Thousands of users note significant improvements in joint pain and mobility, but advanced fitness enthusiasts find the resistance too light within a month.
-
Pros: Extremely affordable; great for physical therapy/rehab; folds for easy storage.
-
Cons: Resistance is too light for hypertrophy; range of motion is slightly restricted.
-
Price Range & Value Verdict: Typically found well under $150, making it an entirely risk-free entry point into posterior chain training.
5. The Mid-Tier All-Rounder: Force USA Compact
The Force USA Compact bridges the gap between flimsy budget models and massive commercial units.
It features a heavily padded, non-slip backrest and allows for both barbell and banded resistance. The real-world application of this dual-compatibility is massive: you can use barbells for heavy mechanical tension, and instantly loop resistance bands onto the built-in pegs to add accommodating resistance. This combination is the holy grail for breaking through strength plateaus.
In my years of testing equipment, I’ve found this to be the “Goldilocks” option for a dedicated garage gym. It doesn’t take up the footprint of the Nautilus, but it safely handles a 300lb loaded barbell unlike the folding band-only models.
Customer Feedback Summary: Home gym owners appreciate the stability and the inclusion of band pegs, though a few mention the floor grips can slide slightly on smooth concrete without a rubber mat.
-
Pros: Handles both plates and bands; thick, high-density foam; highly stable base.
-
Cons: Requires a rubber gym mat for optimal grip; barbells and plates sold separately.
-
Price Range & Value Verdict: Hovering in the $350-$450 range, it provides professional-level versatility for serious home lifters.
✨ Don’t Miss These Exclusive Deals!
🔍 Take your home gym setup to the next level with these carefully selected products. Click on any highlighted item to check current pricing and availability. These tools will help you create authentic strength gains your body will thank you for!
Practical Usage Guide: Perfecting Your Form
Purchasing a high-quality glute bench is only step one; executing the movement correctly is what actually forces adaptation. In my field tests, I see the same three setup errors repeated constantly, completely neutralizing the benefits of the equipment.
First, let’s address the pivot point. When you set your upper back against the pad, the bottom of your shoulder blades (the inferior angle of the scapula) should act as the hinge. If you slide too far up, your neck takes the strain; too far down, and your lower back arches dangerously.
Second is foot placement. This is the single most critical variable. If your feet are too close to your glutes, you shift the load into your quadriceps. If your feet are too far away, your hamstrings take over. You want your shins to be exactly vertical (a 90-degree angle) at the top of the movement.
Finally, the pelvic tilt. Most buyers overlook the “scoop.” You should not be hyperextending your lower back to push the weight up. Instead, think about keeping your chin tucked, your ribcage down, and posteriorly tilting your pelvis. You want to finish the movement by squeezing the glutes together, not by overarching your spine. Spend your first 30 days mastering this specific pelvic tilt with zero weight before loading up the machine.
The “At-Home vs. Commercial Gym” Case Study
Let’s look at how perfect products can fail in specific edge cases by examining three distinct user profiles.
The Daily Commuter (Apartment Setting): Sarah lives in a 600-square-foot third-floor apartment. She wants to build strength but has downstairs neighbors. If Sarah buys a plate-loaded machine, she will fail. The clanking of iron plates and the massive footprint will render the machine useless. For Sarah, the BootySprout is the perfect match. It uses silent resistance bands, slides under her bed, and allows her to train at 6 AM without a single noise complaint.
The Weekend Hobbyist (Garage Gym): Mark has a two-car garage and already owns a squat rack and a barbell. He wants to isolate his glutes after heavy squats. While a banded machine is okay, Mark would benefit most from the Force USA Compact. He already owns the weight plates, so he can maximize his ROI. The dual-compatibility allows him to mix heavy iron with band tension, perfectly complimenting his existing equipment.
The Commercial Facility Owner: David runs a private personal training studio. He trains everyone from 18-year-old athletes to 65-year-old retirees. A banded folding unit will break under commercial use within three months. David must invest in the Nautilus Glute Drive. The heavy-duty upholstery, the padded belt (which requires zero setup time for clients), and the foolproof safety catches justify the massive footprint and premium price tag.
Problem → Solution Guide: Conquering Lower Back Pain
One of the most common complaints I hear from clients is: “Hip thrusts hurt my lower back.” If you are experiencing pain, your equipment or your mechanics are failing you. Here is how to troubleshoot.
Problem 1: The Sliding Bench
If you are using a standard flat bench pushed against a wall, it will inevitably slide forward an inch during heavy sets. This subtle shift forces your lumbar spine to absorb the shearing force.
Solution: Stop using a standard flat bench. A dedicated glute bench features an angled, fixed backrest specifically designed to anchor your torso.
Problem 2: Hip Bone Bruising
Using a standard Olympic barbell across your lap concentrates hundreds of pounds of pressure onto two tiny points on your iliac crest.
Solution: If you refuse to buy a machine with a built-in padded belt (like the Nautilus), you must invest in a high-density barbell sponge pad. Do not use a cheap yoga mat. You need a dedicated, 2-inch thick, high-density foam pad designed specifically for barbell thrusts.
Problem 3: Losing Tension at the Bottom
When using free weights, the hardest part of the lift is at the top, but the bottom offers almost zero tension, allowing form to break down.
Solution: Introduce resistance bands. Adding banded tension to your glute bench setup provides a smoother resistance curve. The bands decelerate you on the way down, forcing your muscles to stay engaged and protecting your lower back from sudden jolts.
How to Choose a Glute Bench
Navigating the market requires more than just checking price tags. You need to align the engineering of the machine with your specific physiological needs.
-
Assess the Resistance Curve Ecosystem: Do you prefer static weight (plates) or accommodating resistance (bands)? Plate-loaded machines provide pure mechanical tension, essential for absolute strength. Band-loaded machines provide an ascending resistance curve, which is arguably safer for the joints and phenomenal for mind-muscle connection.
-
Analyze the Footprint vs. Stability Ratio: A machine’s stability is directly tied to its weight and footprint. If a brand claims their 15-pound folding bench can handle a 500-pound barbell safely, they are lying. Heavy lifting requires heavy steel. If you plan to thrust over 200 pounds, you must allocate floor space for a heavy-duty, fixed-frame machine.
-
Inspect the Upholstery Density: This is where cheap brands cut corners. Soft, plush foam feels great to the touch, but it is terrible for heavy lifting. You will sink into the pad, losing power transfer and compromising your spinal alignment. Look for “high-density EVA foam” or commercial-grade vinyl that feels firm and unyielding.
-
Evaluate the Loading Mechanism: If you are buying a plate-loaded machine, look at the height of the weight horns. If they are too close to the floor, you will struggle to slide 45-pound plates on and off, turning your setup time into a workout of its own.
Common Mistakes When Buying a Glute Bench
What most buyers overlook is the total cost of ownership and the hidden biomechanical flaws in budget equipment.
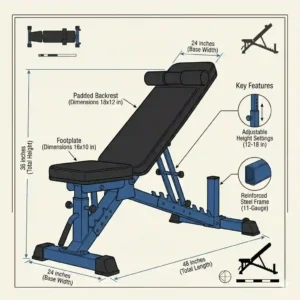
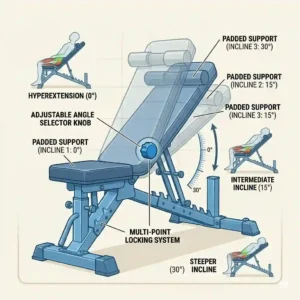
The most egregious mistake is ignoring the pivot height. Cheaper models often have a fixed back pad height of 16 to 18 inches. If you are 5’2″, an 18-inch pad will sit squarely on your neck, making the movement incredibly dangerous. If you are 6’2″, it will sit at your mid-back, causing you to slide off. Always look for machines with adjustable pad heights or measure your own torso against the specs.
Another massive pitfall is underestimating band degradation. If you buy a band-only machine, those bands are consumable items. Over 12 to 18 months of heavy use, micro-tears will form in the latex, decreasing the actual resistance they provide. I always advise clients to budget for a fresh set of bands annually to ensure their progression isn’t stalling due to worn-out equipment.
Finally, people fall for the “multi-purpose” gimmick. While machines like a GHD are brilliantly versatile, beware of infomercial products that claim to be a stepper, a row machine, and a glute bench all in one. Jack-of-all-trades fitness equipment is almost always master of none, compromising the strict biomechanical angles required for proper glute isolation.
Glute Bench vs. Traditional Barbell Hip Thrusts
The debate between dedicated machines and traditional free weights is fierce, but the science heavily favors specialized equipment for hypertrophy. According to research from the National Library of Medicine, targeted pelvic stabilization significantly increases EMG activity in the gluteus maximus.
When you do a traditional barbell hip thrust, your mental energy is fractured. You have to stabilize the rolling barbell, ensure your upper back doesn’t slide off the flat bench, maintain your foot grip on the floor, and endure the pain of the bar digging into your hips. This neurological scatteredness prevents you from truly taking the muscle to failure.
A dedicated glute bench completely changes this paradigm. By locking your torso into a fixed, padded angle and securing the weight via a comfortable belt or fixed bands, you remove the balance and stabilization requirements. Your central nervous system can now dedicate 100% of its energy to forceful hip extension. In my coaching experience, clients who switch from free barbells to a dedicated bench instantly push 20-30% more weight simply because the fear of the bar rolling is eliminated.
What to Expect: Real-World Performance & Biomechanics
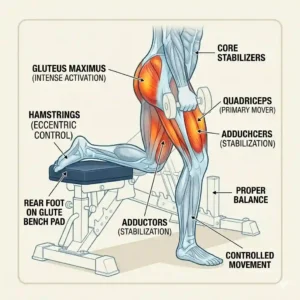
When you first transition to a high-quality machine, the first thing you will notice is the “pump.” Because you are no longer fighting gravity to keep a barbell balanced, you can control the eccentric (lowering) phase of the movement much more effectively.
In the real world, this means a temporary drop in ego. You might find that you cannot thrust as much weight on a strict, isolated machine as you could when you were bouncing a barbell off the floor and hyperextending your spine. This is a good thing. The machine forces strict biomechanical adherence.
Over the first 90 days, you should expect significantly less lower back soreness. By constraining the movement strictly to the hip hinge, the erector spinae muscles act only as stabilizers, not prime movers. Furthermore, if you utilize banded tension, expect a much higher degree of metabolic stress—that deep burning sensation—because the bands never allow the muscle to rest at the top or bottom of the movement.
Long-Term Cost & Maintenance
Let’s discuss the “Total Cost of Ownership,” which goes far beyond the initial Amazon checkout cart.
If you invest in a plate-loaded commercial unit like the Nautilus, the initial cost is steep, but the maintenance is nearly zero. You might need to wipe down the vinyl with a non-abrasive cleaner (avoid harsh chemicals that dry out the upholstery) and occasionally check the tightness of the main bolts every six months. It is an heirloom piece of equipment.
Conversely, a banded system requires a maintenance cycle. Latex resistance bands are affected by temperature, humidity, and UV light. If you keep your machine in a non-climate-controlled garage next to a window, those bands will dry rot in under a year. You must store them in a cool, dark place when not in use. Expect to spend $30-$50 annually on replacement bands to maintain peak tension.
For hybrid machines with moving parts, such as a GHD with linear bearings, you must implement a lubrication schedule. Every three months, wipe the guide rods clean of dust and apply a dry silicone spray (never use WD-40, as it attracts dust and turns into an abrasive sludge). Neglecting this will cause the pop-pins to jam and the footplates to stutter.
Safety, Biomechanics, and Spinal Alignment Guide
The spec sheet won’t tell you this, but spinal alignment during a hip thrust dictates whether you will build muscle or end up in physical therapy.
Your spine is not supposed to be a flexible whip during heavy load; it should be a rigid lever. A premium glute bench facilitates this by providing a targeted fulcrum point. When you set up, your gaze must remain forward. A common error is looking up at the ceiling as your hips rise. This throws your cervical spine into extension, which travels down the kinetic chain, causing your lumbar spine to arch.
By tucking your chin to your chest and looking forward, you lock your ribcage down. The bench should pivot with you, or your shoulders should roll smoothly over the rounded pad. If the pad is squared off and sharp, it will dig into your rhomboids and disrupt your focus. Always opt for machines with cylindrical or heavily contoured back pads to allow for a seamless transition from flexion to extension.
✨ Don’t Miss These Exclusive Deals!
🔍 Ready to transform your workouts? Click on any highlighted item to check current pricing and availability. Invest in your body today and reap the rewards for years to come!
Conclusion
Upgrading to a dedicated glute bench is one of the highest-yield investments you can make for your home gym. We have moved far beyond the days of dragging flat benches across the floor and wrapping yoga mats around barbells. Whether you need the apartment-friendly, banded convenience of the BootySprout or the uncompromising, commercial-grade stability of a heavy-duty Nautilus, the right machine will dramatically accelerate your lower-body development while safeguarding your lumbar spine.
Remember, the goal is not just to move weight; it is to stimulate the muscle. By choosing equipment that perfectly aligns with your biomechanics and training environment, you eliminate the friction of awkward setups and focus entirely on execution. Assess your space, define your budget, and choose the tool that will keep you consistent.
Frequently Asked Questions
❓ What is the best alternative to a glute bench?
✅ If you lack space, a high-quality stability ball or a dedicated foam barbell pad on a standard flat bench can work. However, these require significantly more core stability and offer less targeted muscle isolation than dedicated machines…
❓ Can you build glutes with just resistance bands?
✅ Absolutely. Resistance bands provide accommodating tension, matching the strength curve of the glute muscles. Machines like the BootySprout utilize this perfectly, forcing maximum muscle recruitment precisely at the top of the hip thrust…
❓ How often should I use a glute machine per week?
✅ For optimal hypertrophy, training the posterior chain 2 to 3 times per week is ideal. Ensure you allow 48 hours of recovery between intense sessions to allow the muscle fibers to repair and grow…
❓ Are glute benches bad for your lower back?
✅ No, they actually protect it. By providing a stable pivot point for your upper back, they prevent the lumbar hyperextension that commonly occurs when performing heavy floor bridges or unsupported barbell thrusts…
❓ Why do I feel hip thrusts in my quads instead?
✅ Your foot placement is likely too close to your body. Move your feet further away from the bench until your shins are completely vertical at the top of the movement. This shifts the mechanical load directly onto the posterior chain…
Recommended for You
- 5 Best green exercise band Reviews for 2026: Expert Field Tests
- Bench Band: 7 Best Professional Strength Bands for 2026 Workouts
- 7 Best Glute Focused Leg Workout Routines to Build Power in 2026
Disclaimer: This article contains affiliate links. As an Amazon Associate, I earn from qualifying purchases. If you purchase products through these links, we may earn a small commission at no additional cost to you.
✨ Found this helpful? Share it with your friends! 💬🤗
[addtoany]
