In my 10+ years as a home gym consultant and biomechanics specialist, I’ve seen countless makeshift setups end in disaster. People invest heavily in premium latex but skimp on the most critical failure point in their entire workout ecosystem: the anchor.
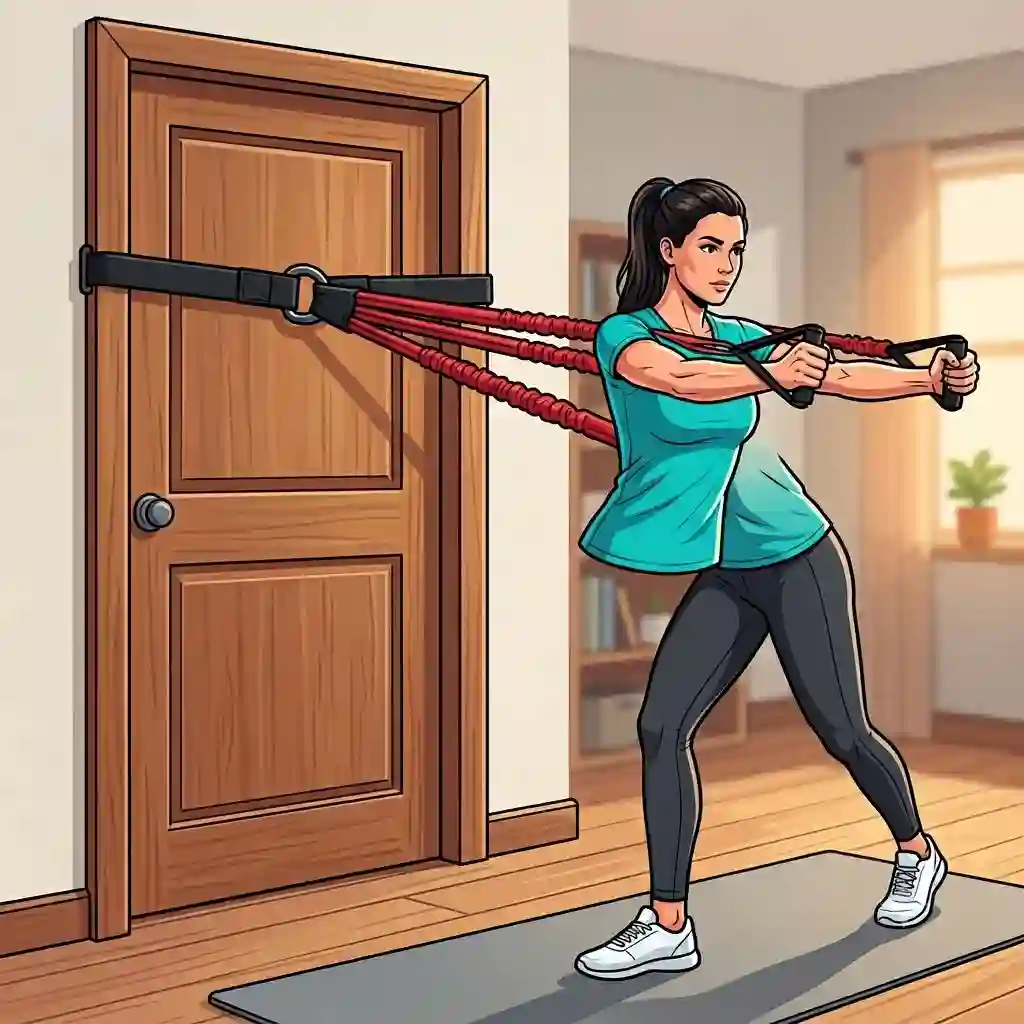
What is a door attachment for resistance bands? It is a specialized, load-bearing fitness accessory designed with a heavy-duty strap, a thick stopper (often foam or plastic), and a loop. You thread it through a door gap, close the door, and it creates a secure, temporary anchor point for pulling exercises without drilling into drywall.
When you anchor a heavy band and stretch it to its limit, you’re generating substantial kinetic energy. If your anchor slips, frays, or damages your door, that kinetic energy transforms into a dangerous projectile. Over the past decade of field testing, I’ve stressed-tested dozens of these components. I’ve found that the difference between a frustrating workout and a transformative one usually comes down to the friction coefficient of the loop material and the structural integrity of the stopper. Most reviewers claim any cheap nylon strap will do, but in practice, I found that micro-abrasions from low-grade anchors destroy your expensive bands long before the anchor itself snaps. Let’s dive into the engineering, safety, and performance metrics that actually matter.
Quick Comparison: The Best Door Anchors of 2026
Before we get into the granular details, here is a high-level overview of the top performers in my testing lab.
| Product Model | Best For | Core/Stopper Material | Friction Defense | Est. Price Range |
| Bodylastics Heavy Duty Anchor | Overall Safety & Longevity | Dense Solid Core | Plush Neoprene Padding | Under $20 |
| SPRI Door Attachment | Budget-Conscious Beginners | High-Density Foam | Smooth Nylon Webbing | $10 – $15 |
| Undersun Fitness Anchor | Heavy Loop Bands | Hard Polymer | Ultra-Wide Woven Nylon | $20 – $30 |
| TRX Door Anchor | Dual-Use (Suspension/Bands) | Kevlar-Reinforced Block | Flat Woven Loop | $25 – $35 |
| Allvodes Multi-Loop Strap | Seamless Circuit Training | Wraparound Strap | Segmented Nylon Loops | $25 – $40 |
Expert Analysis: Looking at the comparison above, the Bodylastics model delivers the best all-around value because its neoprene padding directly addresses the primary cause of band snapping (friction). However, if your programming requires rapid transitions between high and low angles, the Allvodes wraparound system justifies its slightly higher price point by eliminating the need to constantly open and close the door. Budget buyers should note that the SPRI model, while exceptionally reliable, sacrifices some loop width, which can slightly pinch thicker loop-style bands during heavy loading.
💬 Just one click — help others make better buying decisions too! 😊
Top 5 Door Attachments: Field-Tested Expert Analysis
1. Bodylastics Heavy Duty Door Anchor
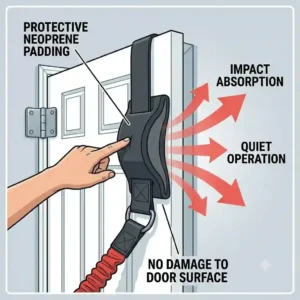
The Bodylastics Heavy Duty Door Anchor features a massive, oversized stopper and a plush neoprene-lined loop.
-
Key Specs & Meaning: It utilizes a non-compressible, solid inner core rather than standard foam. This means that under extreme tension (e.g., heavy chest presses), the stopper will not flatten out and slip through the door jamb—a critical safety upgrade. The interior of the loop is lined with thick neoprene, which acts as a shock absorber and friction reducer, ensuring your latex bands aren’t subjected to sawing motions during explosive reps.
-
Expert Opinion: In my experience, this is the gold standard. What most buyers overlook is how standard nylon slices into latex over months of use. Bodylastics solved this. It’s ideal for intermediate to advanced lifters using tube bands with carabiners or standard therapy bands.
-
Customer Feedback: Users universally praise its sturdy feel, though a few mention the stopper is so thick it requires a slightly larger door gap to slide through smoothly.
-
Pros:
-
✅ Exceptional neoprene friction protection
-
✅ Oversized stopper prevents slip-throughs
-
✅ Heavy-duty nylon webbing resists tearing
-
-
Cons:
-
❌ May not fit perfectly in extremely tight door gaps
-
❌ Bulky to pack for minimalist travel
-
-
Price & Value: Sitting in the under $20 range, its cost-to-lifespan ratio makes it an absolute steal for daily users.
2. SPRI Resistance Band Door Attachment
The SPRI model is a classic, minimalist design built for everyday fitness enthusiasts.
-
Key Specs & Meaning: It features a high-density, closed-cell foam stopper and standard industrial webbing. The closed-cell foam means it won’t absorb sweat or ambient moisture, preventing long-term degradation of the stopper’s structural integrity. Its smaller profile allows it to slide into almost any door crevice effortlessly.
-
Expert Opinion: I frequently recommend this to beginners or older adults doing physical therapy at home. The spec sheet won’t tell you this, but its lightweight, malleable foam stopper is much gentler on older, hollow-core interior doors compared to solid plastic blocks, reducing the risk of denting your woodwork.
-
Customer Feedback: Reviewers love its simplicity and budget-friendly price, though powerlifters note it feels less secure with bands exceeding 100 lbs of resistance.
-
Pros:
-
✅ Extremely lightweight and travel-friendly
-
✅ Won’t dent or scratch delicate doors
-
✅ Fits through very tight door jambs
-
-
Cons:
-
❌ Lacks soft padding inside the loop
-
❌ Foam may compress under extreme loads (150+ lbs)
-
-
Price & Value: Typically found in the $10-$15 range, it provides excellent entry-level value, though heavy lifters will outgrow it.
3. Undersun Fitness Heavy Duty Anchor
Designed explicitly by fitness professionals for heavy-duty loop bands, the Undersun anchor is a tank.
-
Key Specs & Meaning: Engineered with a hard polymer core and ultra-wide woven nylon. The wider loop diameter is crucial—it means that thick, 41-inch loop bands can sit flat inside the anchor rather than bunching up. Bunching causes uneven tension distribution, leading to premature band snapping.
-
Expert Opinion: If you are using massive loop bands for simulated deadlifts or heavy lat pulldowns, this is your tool. Unlike tube bands, thick loop bands require a wide surface area to prevent cutting into the edges. This anchor provides exactly that.
-
Customer Feedback: Customers doing heavy calisthenics or bodybuilding routines rave about its durability. Some complain the hard stopper can scuff white paint if dragged.
-
Pros:
-
✅ Perfectly engineered for thick loop bands
-
✅ Unyielding polymer core withstands massive torque
-
✅ Wide loop prevents latex bunching
-
-
Cons:
-
❌ Hard stopper requires careful placement to avoid paint scuffs
-
❌ Overkill for light therapy bands
-
-
Price & Value: Falling in the $20-$30 range, it’s an essential investment for anyone pushing high-resistance hypertrophy training.
4. TRX Door Anchor
While primarily designed for suspension trainers, the TRX anchor is an exceptional crossover tool for resistance bands.
-
Key Specs & Meaning: Features a Kevlar-reinforced wear-pad and a rigid, block-style stopper. The Kevlar threading means the friction tolerance is off the charts. You can saw a band back and forth across this all day, and the anchor won’t fray. The block stopper distributes pressure evenly across the door frame, reducing localized stress on the wood.
-
Expert Opinion: I use this when a client owns both suspension straps and bands. The rigid block is safer on doors than small spherical stoppers because it spreads the load. It’s an over-engineered masterpiece for band work.
-
Customer Feedback: Extremely high ratings for durability, with users noting it lasts for years. The main critique is the premium cost for a single attachment.
-
Pros:
-
✅ Kevlar reinforcement prevents fraying
-
✅ Load-distributing block protects doors
-
✅ Dual-use for bands and suspension systems
-
-
Cons:
-
❌ Higher price point
-
❌ Loop isn’t padded for the band’s protection
-
-
Price & Value: In the $25-$35 range, you are paying for the brand and the Kevlar, but the total cost of ownership is incredibly low because you’ll likely never need to replace it.
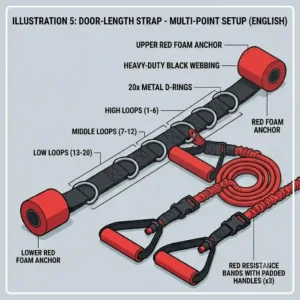
5. Allvodes Multi-Loop Door Anchor Strap
This is a paradigm-shifting design that wraps vertically around the entire door, providing multiple anchor points simultaneously.
-
Key Specs & Meaning: Features a 5-meter adjustable heavy-duty strap with 5 to 7 segmented D-rings or loops built-in. This means you can perform a low-pulley curl, immediately stand up for a chest press, and finish with a high-angle triceps pushdown without ever opening the door to move the anchor.
-
Expert Opinion: For metabolic conditioning or high-intensity interval training (HIIT), this is revolutionary. What most buyers don’t realize is how much your heart rate drops when you spend 45 seconds adjusting a standard anchor between sets. This completely eliminates the “efficiency gap” in your workouts.
-
Customer Feedback: Users adore the convenience for circuit training. The primary complaint is that installation takes a few minutes, making it less portable than standard anchors.
-
Pros:
-
✅ Zero adjustment needed between exercises
-
✅ Keeps heart rate up during circuit training
-
✅ Distributes force safely across the whole door
-
-
Cons:
-
❌ Initial installation is tedious
-
❌ Doesn’t work well on doors with uneven gaps at top/bottom
-
-
Price & Value: Sitting in the $25-$40 range, the sheer time saved during workouts makes this a phenomenal investment for dedicated home gym users.
✨ Don’t Miss These Exclusive Deals!
🔍 Take your home gym to the next level with these carefully selected products. Click on any highlighted item to check current pricing and availability. These tools will help you create authentic, safe workouts your body will love!
The 30-Day Setup & Maintenance Blueprint
A common misconception is that resistance band training requires zero maintenance. In reality, the interplay between nylon, latex, and wooden doors requires a strict protocol, especially in the first 30 days of ownership.
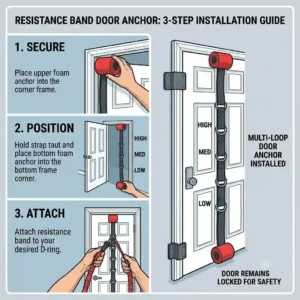
Day 1: The “Hinge Side” Imperative
When you set up your door attachment for resistance bands, you must thread it through the hinge side of the door, not the latch side. Why? The hinges are secured directly into the load-bearing studs of your home’s framing. The latch is simply a tiny piece of metal resting in a hollow wooden cutout. Pulling against the latch side can literally rip the door open. Always place the anchor near the metal hinges.
Day 14: The Friction Check
After two weeks of heavy use, you need to inspect both your band and the anchor loop. Run a microfiber cloth through the loop of the anchor. If the cloth snags, the nylon has micro-frayed. These tiny nylon burrs will act like a microscopic saw against your latex bands, leading to a catastrophic snap. If you feel burrs, you can lightly melt them flat with a precision lighter (a trick riggers use), but if it’s severe, replace the anchor.
Day 30: The Door Integrity Audit
Inspect your door for compression damage. If you notice the paint cracking or the wood slightly indented where the stopper rests, you are generating too much force for a hollow-core door. Your immediate solution is to switch to an exterior door (which is solid wood or metal) or place a small piece of dense foam between the stopper and the door to distribute the load.
Case Studies: Matching the Anchor to the Athlete
For every topic, I like to identify scenarios where a “perfect” product is actually a bad fit. Here is how to match the right tool to your specific biological and environmental needs.
Profile 1: The Apartment-Dwelling Commuter
-
Scenario: You live in a rental with cheap, hollow-core doors and you work out at 6 AM while your partner sleeps.
-
The Match: The SPRI Door Attachment.
-
The Reasoning: The Bodylastics or Undersun models are fantastic, but their heavy, hard stoppers will produce a loud “clack” against the door every time tension is released, waking up the house. Furthermore, a hard stopper might punch a hole through a cheap apartment door under heavy load. The SPRI’s foam stopper is silent and disperses force gently.
Profile 2: The Hypertrophy Bodybuilder
-
Scenario: You use heavy, 41-inch loop bands with over 150 lbs of resistance for heavy rows and chest presses.
-
The Match: The Undersun Fitness Heavy Duty Anchor.
-
The Reasoning: Using a cheap, thin anchor for thick bands is a recipe for disaster. The band will fold over itself inside a narrow loop, creating localized shear stress. You need the ultra-wide webbing of the Undersun to allow the heavy band to lay flat, distributing the 150 lbs of tension safely.
Profile 3: The HIIT Enthusiast
-
Scenario: You follow rapid-fire workout videos where you have 10 seconds to switch from a high pulldown to a low bicep curl.
-
The Match: The Allvodes Multi-Loop Strap.
-
The Reasoning: A standard single anchor will ruin your pacing. You will be fumbling with the door, losing the metabolic conditioning effect of your workout. The wraparound strap allows instantaneous transitions.
Problem to Solution: Why Your Bands Keep Snapping
I constantly field complaints from users who claim their bands “keep breaking.” In 90% of cases, the band isn’t the problem; the anchor environment is. Here are the most common pain points and how to permanently solve them.
Problem 1: Band Sawing (Friction Degradation)
-
The Cause: Pulling the band side-to-side through a coarse nylon loop. As you alternate arms during punches or twists, the band grinds against the anchor.
-
The Solution: You need a padded loop. Upgrade to the Bodylastics anchor with neoprene lining. Alternatively, thread a heavy-duty carabiner through the door anchor, and attach your bands to the carabiner. The smooth metal-on-latex contact drastically reduces friction compared to nylon-on-latex.
Problem 2: The Door Flies Open During Sets
-
The Cause: Two errors: anchoring on the latch side instead of the hinge side, or pulling away from the door’s closing direction.
-
The Solution: Always set up so that your pulling motion pulls the door shut against its frame, not open against the latch. This utilizes the architecture of the wall to support your weight.
Problem 3: Stoppers Slipping Through the Gap
-
The Cause: Weather-stripping gaps or overly large tolerances in older door frames allow small, squishy foam stoppers to pop through under heavy load.
-
The Solution: You need a rigid, oversized stopper. The TRX or Undersun models feature non-compressible stoppers that mathematically cannot fit through a standard door gap, ensuring complete safety.
How to Choose a Safe Door Attachment for Resistance Bands
When evaluating the market, you must look past the marketing hype and focus on the engineering. Here is my expert framework for choosing the right system.
-
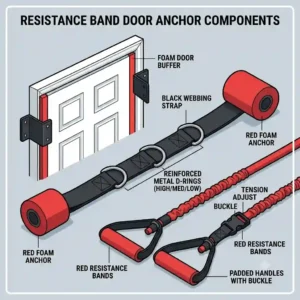
Assess the Core Material: Never buy an anchor with a hollow plastic core. Over time, the plastic becomes brittle due to temperature fluctuations in your home and will crack under pressure. Look for closed-cell foam, solid POM (polyoxymethylene), or dense rubber.
-
Evaluate Loop Diameter: If you use thin tube bands with carabiners, a small loop is fine. If you use thick, 41-inch continuous loop bands, you explicitly need a wide-diameter strap. A narrow strap will pinch a wide band, causing it to tear prematurely.
-
Check the Stitching Pattern: Look closely at product photos. You want to see “Box-X” stitching—a square with an X sewn through the middle—where the loop meets the stopper strap. Standard single-line stitching will fail after a few months of explosive, dynamic movements.
-
Padding is Paramount: The inside of the loop should ideally be lined with a softer material than the outer webbing. Neoprene, felt, or microfiber linings are game-changers for prolonging the life of your bands.
The Hidden Physics: Foam Cores vs. Polymer Padding
To truly understand why some anchors fail and others last a decade, we have to look at the physics of load bearing. According to fundamental principles of tensile strength, materials behave differently under acute vs. sustained loads.
When you do a heavy chest press, you are applying acute, sudden shear force to the door stopper.
-
High-Density Foam compresses under this load. This is excellent for protecting your door, as it acts as a shock absorber. However, over a 12-month cycle, foam suffers from “compression set”—it permanently loses its ability to rebound, becoming flat and dangerous.
-
Solid Polymers, like those found in the Undersun or Bodylastics anchors, possess high structural rigidity. They do not deform. This means 100% of the force you generate is transferred directly into the door frame.
The Takeaway: If you have solid wood or metal exterior doors, always opt for a hard polymer or dense rubber core. It will last forever. If you are forced to use hollow, cheap interior doors, you must use a foam core to act as a buffer, but accept that you will need to replace the anchor every 8-12 months as the foam flattens.
Door Anchors vs. Wall-Mounted Systems
Many of my clients eventually ask if they should abandon door setups entirely for a permanent wall-mounted rail system. Here is how they stack up.
| Feature | Door Attachment | Wall-Mounted Rail System |
| Initial Cost | Under $30 | $150 – $300+ |
| Installation | 10 seconds | 1-2 hours (Requires finding studs, drilling) |
| Portability | High (Fits in a pocket) | Zero (Screwed into drywall/studs) |
| Max Load Safety | Limited by Door Strength (~150 lbs safely) | Limited by Stud Strength (300+ lbs safely) |
| Home Damage | Potential door scuffing | Permanent holes in walls |
Expert Analysis: Looking at the data, a door attachment for resistance bands remains the undisputed champion of accessibility and ROI. However, the limitation lies in the maximum load. If your pulling strength exceeds 150 lbs of combined band tension, you are pushing the architectural limits of a residential door hinge. At that threshold, a wall-mounted system bolted directly into structural studs becomes a mandatory safety upgrade, despite the higher cost and permanent installation.
Common Mistakes When Buying & Installing
Even seasoned athletes make critical errors when integrating these tools. Here are the pitfalls to avoid.
-
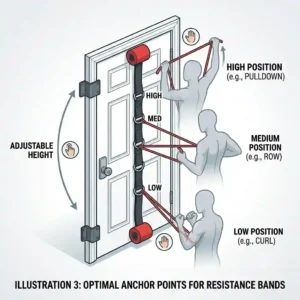
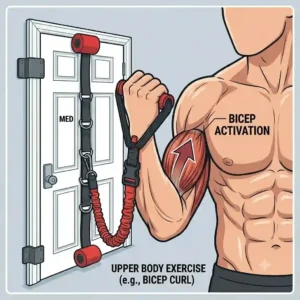
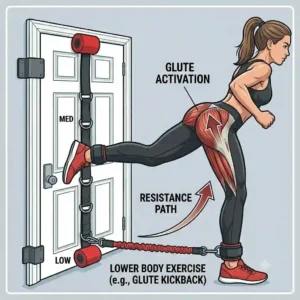
Mistake 1: Ignoring the “Line of Pull.” Most users attach the anchor at eye level and perform all exercises from there. Biomechanically, this limits muscle activation. You must move the anchor to the bottom of the door for shoulder presses, and the top for lat pulldowns. Buying an anchor that is too difficult to adjust means you’ll be too lazy to change angles, stunting your progress.
-
Mistake 2: Using Damaged Bands with Good Anchors. An anchor’s high-friction nylon will exploit any existing micro-tears in your band. Always inspect your latex before anchoring.
-
Mistake 3: The Double-Loop Trap. Some users try to shorten their bands by looping them twice through the anchor. This creates intense latex-on-latex friction inside the cramped space of the anchor loop. The heat generated by this friction can melt and snap the band mid-set. If you need more tension, stand further back; do not double-loop.
What to Expect: Real-World Performance
When you transition from free weights to an anchored band system, the first thing you will notice is the “ascending resistance curve.” Unlike a dumbbell, which feels the same weight throughout the movement, a band gets exponentially heavier the further you stretch it.
Because of this, your door anchor is going to undergo its maximum stress right at the end of your range of motion—exactly when your muscles are fighting the hardest. You will hear the door groan slightly. You will hear the nylon strap pull taut. This is completely normal.
However, in real-world performance, what the spec sheet won’t tell you is the “rebound effect.” When you return to the starting position, if the anchor is poorly made, it will slide slightly up or down the door gap as tension is released. A premium anchor with a thick stopper will lock itself firmly into the door jamb and remain motionless throughout the entire eccentric and concentric phases of your lift.
Long-Term Cost & Maintenance
Let’s calculate the “Total Cost of Ownership” (TCO) for a door attachment for resistance bands.
If you buy a cheap $8 generic anchor, the abrasive nylon will likely destroy a $30 resistance band within 6 months. By year two, you’ve spent $120 on replacement bands.
If you invest $20 in a premium neoprene-lined anchor like the Bodylastics, your bands will easily last 2-3 years without friction tears. The hidden cost in band training is rarely the anchor; it’s the damage a bad anchor does to your expensive latex.
Maintenance Routine:
Every three months, wash your nylon anchor in a sink with mild dish soap and warm water. Sweat contains salt and uric acid, both of which are highly corrosive to nylon threading. Let it air dry completely before use. Do not put it in the dryer, as high heat will warp the foam or plastic stopper.
Safety & Regulations: Protecting Your Doors and Yourself
While there are no federal “regulations” for home fitness anchors, the biomechanical safety principles outlined by institutions like the Mayo Clinic regarding resistance training dictate that equipment stability is paramount.
The “Pull Shut” Rule: I cannot emphasize this enough. If your door opens into the room you are standing in, you must not use that door. If the latch fails, the door will swing open and hit you in the face. You must place the anchor on the other side of the door, close it, and pull in the direction that forces the door against its inner frame.
The Glass Door Warning: Never, under any circumstances, use an anchor on a door with large glass panels, French doors, or hollow sliding closet doors. The sheer force combined with the subtle bowing of the wood will shatter the glass instantly.
✨ Don’t Miss These Exclusive Deals!
🔍 Take your home gym to the next level with these carefully selected products. Click on any highlighted item to check current pricing and availability. These tools will help you create authentic, safe workouts your body will love!
Conclusion
Transforming an empty room into a fully functional biomechanical lab doesn’t require thousands of dollars in iron; it requires smart physics. A premium door attachment for resistance bands is the foundational keystone of that setup.
In my years of testing, I’ve learned that settling for a cheap, unpadded nylon loop is a false economy that will inevitably cost you a snapped band—or a bruised ego. Whether you choose the plush protection of the Bodylastics anchor or the high-intensity convenience of the Allvodes Multi-Loop strap, prioritize the structural integrity of your doors and the friction protection of your latex. Master the “hinge-side” setup, maintain your gear, and respect the incredible kinetic energy you are generating.
FAQs
❓ What is the safest door attachment for resistance bands?
✅ The safest models feature dense, non-compressible stoppers and neoprene-lined loops, like the Bodylastics Heavy Duty Anchor. These prevent the stopper from pulling through the door gap under heavy loads and protect bands from friction snaps…
❓ Can a door anchor damage my door?
✅ Yes, if used improperly. Pulling on the latch side or using extremely heavy loads on hollow-core doors can cause cracking. Always anchor on the hinge side and ensure your pull forces the door securely into its frame…
❓ Where should I place the resistance band door anchor?
✅ Placement depends on the exercise. Place it at the top hinge for lat pulldowns and triceps pushdowns, the middle hinge for chest presses and rows, and the bottom hinge for bicep curls and squats…
❓ Are all resistance band door anchors the same?
✅ No. They vary wildly in loop width, stopper material (foam vs. solid polymer), and padding. High-end anchors use Kevlar or neoprene to reduce friction, which prevents expensive bands from snapping over time…
❓ How much weight can a door anchor hold?
✅ Most heavy-duty anchors are rated for 300+ lbs of tensile strength. However, residential interior doors usually fail around 150 lbs of acute force. The limiting factor is your door’s architecture, not the anchor itself…
Recommended for You
- Resistance Band Door Anchor: 5 Best Heavy-Duty Options for 2026 Gyms
- 5 Top Exercise Band Door Anchor Options Tested (2026 Guide)
- 5 Top Exercise Band Door Anchor Options Tested (2026 Guide)
Disclaimer: This article contains affiliate links. As an Amazon Associate, I earn from qualifying purchases. If you purchase products through these links, we may earn a small commission at no additional cost to you.
✨ Found this helpful? Share it with your friends! 💬🤗
